We leverage open-source resources and tools to teach students valuable tech skills. The resources are continually updated and refined by developers around the world, ensuring our students learn with the most current, widely-used technologies.
This unit introduces Kotlin and how to set up the development environment for Android development.
Kotlin is a modern, trending programming language that was released in 2016 by JetBrains.
It has become very popular since it is compatible with Java (one of the most popular programming languages out there), which means that Java code (and libraries) can be used in Kotlin programs.
This tutorial will teach you the very basics of Kotlin.
It is not necessary to have any prior programming experience.
The easiest way to get started with Kotlin is by using an IDE (Integrated Development Environment).
An IDE is used to edit and compile code efficiently.
For this guide, we will use IntelliJ IDEA, developed by the same creators of Kotlin. It is free to download from:
Once IntelliJ is downloaded and installed, click on the New Project button to get started:
Then, click on "Kotlin" in the left-side menu and enter a name for your project:
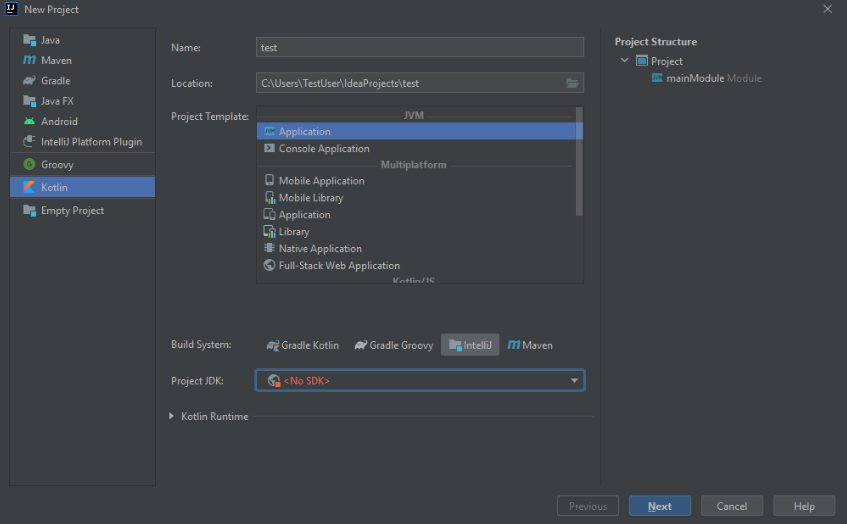
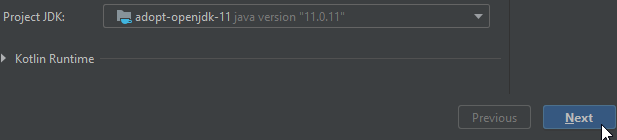
Next, we need to install the JDK (Java Development Kit) to run Kotlin projects. Click on the "Project JDK" menu, select "Download JDK", then choose a version and vendor (e.g., AdoptOpenJDK 11), and click "Download":
When the JDK is installed, select it from the menu and click "Next", then "Finish":
Now, let's start working with Kotlin! Open the src (source) folder and follow the steps in the image below to create a new Kotlin file:
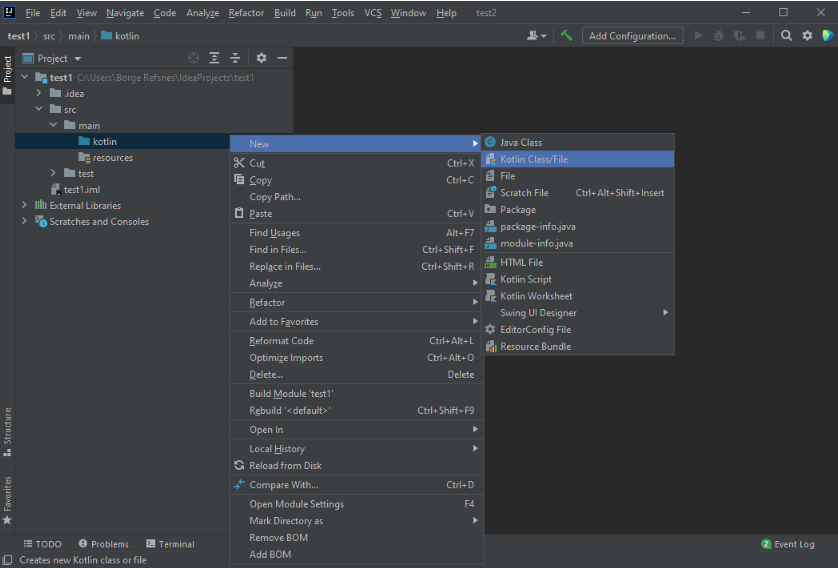
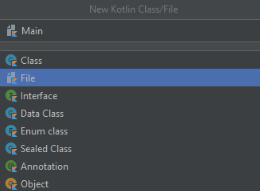
Choose "File", enter a name for your Kotlin file (e.g.,
Main
):
In the previous chapter, we created a Kotlin file called Main.kt
, and we used the following
code to print "Hello World" to the screen:
fun main() {
println("Hello World")
}
The fun
keyword is used to declare a function. A function is a block of
code designed
to perform a particular task.
In the example above, we declared the main()
function, which is the entry point of every
Kotlin program.
Any code inside the main()
function’s curly brackets { }
will be executed.
The println()
function is inside main()
, meaning that it will be executed.
The println()
function is used to output/print text, and in our example, it will output:
Hello World
In Kotlin, **statements do not require a semicolon** (;
) at the end, unlike Java, C++, or
C#.
However, if you place multiple statements on the same line, you **must** use a semicolon to separate them:
fun main() { println("Hello"); println("World") }
Hello
World
Before Kotlin version **1.3**, the main()
function was required to have parameters.
The correct syntax was:
fun main(args: Array) {
println("Hello World")
}
However, starting from Kotlin 1.3, **parameters are optional**, and the program will run fine without them.
fun main() {
println("Hello World")
}
Even though parameters are no longer required, you can still use them if needed. For example, you can access command-line arguments like this:
fun main(args: Array) {
if (args.isNotEmpty()) {
println("Command-line argument: " + args[0])
} else {
println("No arguments provided.")
}
}
If you run the program with an argument (e.g., Hello Kotlin
), the output will be:
Command-line argument: Hello Kotlin
Want to experiment with Kotlin code? Use the Try it yourself Tool to test the examples online.
🎉 Now that you understand Kotlin syntax, let's move on to writing more advanced Kotlin programs!
The println()
function is used to output values or print text in Kotlin.
fun main() {
println("Hello World")
}
Hello World
You can use multiple println()
functions to print text on separate lines.
fun main() {
println("Hello World!")
println("I am learning Kotlin.")
println("It is awesome!")
}
Hello World!
I am learning Kotlin.
It is awesome!
Kotlin allows you to print numbers and perform mathematical operations directly inside
println()
.
fun main() {
println(3 + 3)
}
6
print()
FunctionThe print()
function is similar to println()
, but it does not insert a
new line at the end of the output.
fun main() {
print("Hello World! ")
print("I am learning Kotlin. ")
print("It is awesome!")
}
Hello World! I am learning Kotlin. It is awesome!
💡 Notice how all the text is printed on the same line.
println()
vs. print()
Function | Description | Example |
---|---|---|
println() |
Prints text and moves to a new line | println("Hello") |
print() |
Prints text on the same line | print("Hello") |
Want to test your Kotlin code? Use the Try it yourself Tool to practice printing output in Kotlin.
🎉 Now that you understand how to print text and numbers in Kotlin, let's move on to working with **variables**! 🚀
Comments are used to **document** code, make it more **readable**, and prevent execution when testing alternative code.
There are **two types** of comments in Kotlin:
//
)/* */
)Single-line comments start with **two forward slashes (`//`)**.
Any text after //
on the same line is **ignored by Kotlin** (will not be executed).
// This is a comment
println("Hello World")
println("Hello World") // This is a comment
Hello World
💡 The comment does not affect the execution of the code.
Multi-line comments start with /*
and end with */
.
Everything inside /* ... */
will be **ignored** by the compiler.
/* The code below will print the words "Hello World"
to the screen, and it is amazing */
println("Hello World")
Hello World
Developers often **disable code** by turning it into a comment:
// println("This line will not run")
println("Hello Kotlin!")
Hello Kotlin!
💡 The first line is ignored because it is a **comment**.
Want to experiment with Kotlin comments? Use the Try it yourself Tool to test the examples online.
🎉 Now that you understand Kotlin comments, let's move on to **Kotlin Variables!** 🚀
This unit introduces **Kotlin Variables**, how to declare them, their types, and best practices.
Variables are containers for storing data values.
To create a variable, use var
or val
, and assign a value using
the =
sign.
var variableName = value
val variableName = value
var name = "John"
val birthYear = 1975
println(name) // Output: John
println(birthYear) // Output: 1975
var
and val
var
: Variables **declared with `var` can be changed/modified**.val
: Variables **declared with `val` cannot be changed** (like
constants).var name = "Alice"
name = "Bob" // This works because 'name' is declared with 'var'
val pi = 3.14159
pi = 3.14 // Error! 'val' variables cannot be changed
Kotlin **does not require specifying variable types** (e.g., `String`, `Int`), because it can infer them automatically.
var name = "John" // String
val birthYear = 1975 // Int
println(name) // Output: John
println(birthYear) // Output: 1975
However, you can **specify the type explicitly** if needed.
var name: String = "John"
val birthYear: Int = 1975
println(name)
println(birthYear)
You **must specify the type** if you declare a variable without assigning a value.
var name: String
name = "John"
println(name)
var name
name = "John"
println(name) // ERROR! Kotlin does not know the type of 'name'
💡 You will learn more about **Data Types** in the next chapter.
val
Variables created with **`val` cannot be reassigned** after they are initialized.
val name = "John"
name = "Robert" // Error: Val cannot be reassigned
println(name)
var
allows reassignment:var name = "John"
name = "Robert"
println(name) // Output: Robert
val
?The **`val` keyword** is useful when you want a variable to always store the same value, like PI.
val pi = 3.14159265359
println(pi) // Output: 3.14159265359
You can display variables using println()
.
val name = "John"
println("Hello " + name)
Hello John
You can also **combine two variables using `+`**.
val firstName = "John "
val lastName = "Doe"
val fullName = firstName + lastName
println(fullName) // Output: John Doe
val x = 5
val y = 6
println(x + y) // Output: 11
Variable names can contain:
_
$
(Not recommended)By convention, Kotlin uses **camelCase** for variable names.
var firstName = "John" // ✅ Good practice
var lastName = "Doe"
var myAge = 25
⚠️ Avoid writing variables like `firstname` or `lastname`. CamelCase improves readability.
Want to experiment with Kotlin variables? Use the Try it yourself Tool to practice variables in Kotlin.
🎉 Now that you understand Kotlin variables, let's move on to **Data Types!** 🚀
In Kotlin, the type of a variable is determined by its value:
val myNum = 5 // Int
val myDoubleNum = 5.99 // Double
val myLetter = 'D' // Char
val myBoolean = true // Boolean
val myText = "Hello" // String
However, you can also **explicitly specify the type**:
val myNum: Int = 5
val myDoubleNum: Double = 5.99
val myLetter: Char = 'D'
val myBoolean: Boolean = true
val myText: String = "Hello"
Kotlin will automatically determine the type in most cases, but sometimes you **must specify it explicitly**.
Numbers in Kotlin are categorized into **Integer Types** and **Floating Point Types**.
Type | Size | Range |
---|---|---|
Byte | 8-bit | -128 to 127 |
Short | 16-bit | -32,768 to 32,767 |
Int | 32-bit | -2,147,483,648 to 2,147,483,647 |
Long | 64-bit | -9,223,372,036,854,775,808 to 9,223,372,036,854,775,807 |
val myByte: Byte = 100
val myShort: Short = 5000
val myInt: Int = 100000
val myLong: Long = 15000000000L
💡 Long
values should end with **"L"** to differentiate them from Int
.
Type | Size | Precision |
---|---|---|
Float | 32-bit | 6-7 decimal places |
Double | 64-bit | 15 decimal places |
val myFloat: Float = 5.75F
val myDouble: Double = 19.99
💡 **Use "F" at the end** of Float values to differentiate them from Double.
Floating point numbers can be written using **scientific notation**:
val myNum1: Float = 35E3F
val myNum2: Double = 12E4
println(myNum1) // Output: 35000.0
println(myNum2) // Output: 120000.0
The **Boolean** data type can hold only two values: `true` or `false`.
val isKotlinFun: Boolean = true
val isFishTasty: Boolean = false
println(isKotlinFun) // Output: true
println(isFishTasty) // Output: false
The **Char** data type stores **single characters** and must be enclosed in **single quotes** (`'A'`).
val myGrade: Char = 'B'
println(myGrade) // Output: B
⚠️ **You cannot use ASCII values** to assign characters in Kotlin:
val myLetter: Char = 66
println(myLetter) // Error
The **String** data type is used to store a sequence of characters.
val myText: String = "Hello World"
println(myText)
Arrays store **multiple values** in a **single variable**.
💡 You will learn more about Arrays in the Arrays chapter.
In Kotlin, you **must use conversion functions** to change a numeric type to another type.
val x: Int = 5
val y: Long = x // Error! Type mismatch
val x: Int = 5
val y: Long = x.toLong()
println(y) // Output: 5
Want to experiment with Kotlin Data Types? Use the Try it yourself Tool to practice.
🎉 Now that you understand Kotlin Data Types, let's move on to **Arrays!** 🚀
Operators are used to perform operations on variables and values.
In an operation:
In the operation below, 100 and 50 are operands, and +
is the
operator:
var x = 100 + 50
You can also add variables and values together:
var sum1 = 100 + 50 // 150 (100 + 50)
var sum2 = sum1 + 250 // 400 (150 + 250)
var sum3 = sum2 + sum2 // 800 (400 + 400)
Kotlin operators are categorized into the following groups:
Arithmetic operators perform mathematical operations.
Operator | Name | Description | Example |
---|---|---|---|
+ |
Addition | Adds two values | x + y |
- |
Subtraction | Subtracts one value from another | x - y |
* |
Multiplication | Multiplies two values | x * y |
/ |
Division | Divides one value by another | x / y |
% |
Modulus | Returns the division remainder | x % y |
var a = 10
var b = 5
println(a + b) // Output: 15
println(a - b) // Output: 5
println(a * b) // Output: 50
println(a / b) // Output: 2
println(a % b) // Output: 0
Assignment operators assign values to variables.
Operator | Example | Same As |
---|---|---|
= |
x = 5 |
x = 5 |
+= |
x += 3 |
x = x + 3 |
-= |
x -= 3 |
x = x - 3 |
*= |
x *= 3 |
x = x * 3 |
/= |
x /= 3 |
x = x / 3 |
var x = 10
x += 5 // x = x + 5
println(x) // Output: 15
Comparison operators compare two values and return true or false.
Operator | Name | Example |
---|---|---|
== |
Equal to | x == y |
!= |
Not equal | x != y |
> |
Greater than | x > y |
< |
Less than | x < y |
Logical operators determine the logic between variables or values.
Operator | Name | Description | Example |
---|---|---|---|
&& |
Logical AND | Returns true if both conditions are true | x < 5 && x < 10 |
|| |
Logical OR | Returns true if at least one condition is true | x < 5 || x < 4 |
🎉 Now that you understand Kotlin Operators, let's move on to strings! 🚀
Strings are used for storing text.
A string contains a collection of characters surrounded by **double quotes**:
var greeting = "Hello"
Unlike Java, you do **not** have to specify that the variable should be a String. Kotlin is smart enough to understand that the greeting variable in the example above is a String because of the double quotes.
However, just like with other data types, you can specify the type if you want:
var greeting: String = "Hello"
If you want to create a String **without assigning the value** (and assign the value later), you must specify the type while declaring the variable:
var name: String
name = "John"
println(name)
var name
name = "John"
println(name)
To access the characters (elements) of a string, you must refer to the **index number** inside square brackets.
String indexes start with 0. In the example below, we access the **first and third** elements in
txt
:
var txt = "Hello World"
println(txt[0]) // First element (H)
println(txt[2]) // Third element (l)
Note: Index [0]
is the first element, [1]
is the second element,
[2]
is the third element, and so on.
A **String** in Kotlin is an **object**, which contains properties and functions that can perform certain operations on strings.
For example, the **length** of a string can be found using the length
property:
var txt = "ABCDEFGHIJKLMNOPQRSTUVWXYZ"
println("The length of the txt string is: " + txt.length)
There are many built-in **string functions**, such as toUpperCase()
and
toLowerCase()
:
var txt = "Hello World"
println(txt.toUpperCase()) // Outputs "HELLO WORLD"
println(txt.toLowerCase()) // Outputs "hello world"
The **compareTo(string)** function compares two strings and returns 0
if both are equal:
var txt1 = "Hello World"
var txt2 = "Hello World"
println(txt1.compareTo(txt2)) // Outputs 0 (they are equal)
The indexOf()
function returns the **index (position)** of the first occurrence of a
specified text in a string.
var txt = "Please locate where 'locate' occurs!"
println(txt.indexOf("locate")) // Outputs 7
Note: Kotlin counts positions from **zero (0)**.
To use **quotes inside a string**, use single quotes ('
):
var txt1 = "It's alright"
var txt2 = "That's great"
The +
operator can be used between **strings** to **add them together**. This is called
**concatenation**:
var firstName = "John"
var lastName = "Doe"
println(firstName + " " + lastName)
Note: We added an empty string " "
to create a **space** between
firstName
and lastName
.
You can also use the plus()
function:
var firstName = "John "
var lastName = "Doe"
println(firstName.plus(lastName))
Instead of concatenation, you can also use **"string templates"**, which is an easier way to add variables and expressions inside a string.
Just refer to the variable with the **$ symbol**:
var firstName = "John"
var lastName = "Doe"
println("My name is $firstName $lastName")
Why Use String Templates?
In programming, you often need a data type that can have only two possible values, such as:
For this, Kotlin provides a Boolean data type, which can take only two values: true
or false
.
A Boolean variable can be declared using the Boolean keyword, and it can only take the values true or false.
val isKotlinFun: Boolean = true
val isFishTasty: Boolean = false
println(isKotlinFun) // Outputs: true
println(isFishTasty) // Outputs: false
Explanation:
isKotlinFun
is set to true.isFishTasty
is set to false.Just like other data types in Kotlin, you do not need to specify the type explicitly. Kotlin automatically understands that the values are Boolean.
val isKotlinFun = true
val isFishTasty = false
println(isKotlinFun) // Outputs: true
println(isFishTasty) // Outputs: false
Why does this work?
true
and false
are Boolean
values.Boolean
explicitly.Boolean values are mostly used in conditional statements (like if
statements), which
you will learn more about in a later chapter.
Example: Using Boolean in an If-Else Condition
val isSunny = true
if (isSunny) {
println("Let's go outside!")
} else {
println("Better stay indoors!")
}
Output:
Let's go outside!
Explanation:
if
is true, so it prints "Let's go outside!"
.
isSunny
was false, it would print "Better stay indoors!"
.Booleans are often used to compare values in Kotlin.
val x = 10
val y = 20
println(x > y) // Outputs: false
println(x < y) // Outputs: true
Explanation:
x > y
checks if 10
is greater than 20
, which is
false.x < y
checks if 10
is less than 20
, which is
true.This unit covers conditional statements in Kotlin, including if..else and when expressions.
Kotlin supports the usual logical conditions from mathematics:
a < b
a <= b
a > b
a >= b
a == b
a != b
You can use these conditions to perform different actions based on decisions.
Kotlin provides the following conditionals:
Note: Unlike Java, if..else
can be used as both a statement and an
expression in Kotlin.
The if statement executes a block of code if a condition is true.
if (condition) {
// Code to execute if the condition is true
}
Example: Checking if 20 is greater than 18.
if (20 > 18) {
println("20 is greater than 18")
}
You can also test variables:
val x = 20
val y = 18
if (x > y) {
println("x is greater than y")
}
Explanation: The condition x > y
is true, so "x is greater than y" is
printed.
The else statement executes a block of code when the if condition is false.
if (condition) {
// Code executed if condition is true
} else {
// Code executed if condition is false
}
Example: Check the time and print a greeting.
val time = 20
if (time < 18) {
println("Good day.")
} else {
println("Good evening.")
}
Output: "Good evening."
Explanation: The condition time < 18
is false, so the else block
runs.
The else if statement allows multiple conditions to be checked.
if (condition1) {
// Code executed if condition1 is true
} else if (condition2) {
// Code executed if condition1 is false and condition2 is true
} else {
// Code executed if condition1 and condition2 are both false
}
Example: Check different times of the day.
val time = 22
if (time < 10) {
println("Good morning.")
} else if (time < 20) {
println("Good day.")
} else {
println("Good evening.")
}
Output: "Good evening."
Explanation: The first two conditions are false, so the else block executes.
In Kotlin, if..else
can also return a value and be assigned to a variable.
val time = 20
val greeting = if (time < 18) {
"Good day."
} else {
"Good evening."
}
println(greeting)
Output: "Good evening."
Explanation: Since time
is 20, the else block runs, assigning
"Good evening."
to greeting
.
You can omit the curly braces { }
when if
has only one statement.
val time = 20
val greeting = if (time < 18) "Good day." else "Good evening."
println(greeting)
Output: "Good evening."
Tip: This is similar to the ternary operator in Java.
Instead of writing multiple if..else expressions, Kotlin provides the when expression, which is much easier to read.
The when expression is used to select one of many possible code blocks to execute.
Use a number (1-7) to determine the corresponding day of the week.
val day = 4
val result = when (day) {
1 -> "Monday"
2 -> "Tuesday"
3 -> "Wednesday"
4 -> "Thursday"
5 -> "Friday"
6 -> "Saturday"
7 -> "Sunday"
else -> "Invalid day."
}
println(result)
Thursday
Explanation:
day
is 4.4 -> "Thursday"
exists, "Thursday" is printed.else
branch runs.The when expression works similarly to a switch statement in Java:
day
) is evaluated once.->
) and a result.You can match multiple values in the same branch by separating them with commas.
val number = 2
val description = when (number) {
1, 2, 3 -> "Small number"
4, 5, 6 -> "Medium number"
else -> "Large number"
}
println(description)
Small number
Explanation:
number
is 2, and 1, 2, 3
are grouped together, "Small number"
is printed.You can check if a value is within a range using in
.
val score = 85
val grade = when (score) {
in 90..100 -> "A"
in 80..89 -> "B"
in 70..79 -> "C"
in 60..69 -> "D"
else -> "F"
}
println("Grade: $grade")
Grade: B
Explanation:
score
is 85.85
is in the range 80..89
, "B" is assigned to grade
.
You can use when to assign a value to a variable.
val age = 18
val category = when {
age < 13 -> "Child"
age in 13..19 -> "Teenager"
age in 20..64 -> "Adult"
else -> "Senior"
}
println("Category: $category")
Category: Teenager
Explanation:
category
.age = 18
, the condition age in 13..19
is true, so "Teenager" is
assigned.Loops allow us to execute a block of code multiple times, as long as a specified condition is met.
Loops are useful because they:
The while loop executes a block of code as long as a specified condition is true.
while (condition) {
// Code block to execute
}
In the example below, the loop will run as long as i
is less than 5:
var i = 0
while (i < 5) {
println(i)
i++
}
0
1
2
3
4
Note: Always make sure to increase the loop variable (i++
), otherwise, the loop will
run indefinitely.
The do..while loop is a variation of the while loop.
It will execute the code block at least once before checking the condition, and then repeat the loop as long as the condition remains true.
do {
// Code block to execute
} while (condition)
In the example below, the loop will run at least once before checking the condition:
var i = 0
do {
println(i)
i++
} while (i < 5)
0
1
2
3
4
Note: Like the while loop, always ensure to increase the loop variable (i++
)
to prevent infinite loops.
The break statement is used to exit a loop immediately when a certain condition is met.
In the example below, the loop will stop completely when i
equals 4:
var i = 0
while (i < 10) {
println(i)
i++
if (i == 4) {
break
}
}
0
1
2
3
Explanation:
i = 0
and runs while i < 10
.i == 4
, the break statement is executed, and the loop stops.The continue statement skips the current iteration of the loop when a condition is met, but continues with the next iteration.
In the example below, the number 4 is skipped:
var i = 0
while (i < 10) {
if (i == 4) {
i++
continue
}
println(i)
i++
}
0
1
2
3
5
6
7
8
9
Explanation:
i = 0
to i = 9
.i == 4
, the continue statement skips printing 4 and moves to the
next iteration.This unit covers **Kotlin Arrays**, their operations, and how to manipulate them.
Arrays are used to store multiple values in a single variable instead of creating separate variables for each value.
To create an array, use the arrayOf() function and place the values inside it:
val cars = arrayOf("Volvo", "BMW", "Ford", "Mazda")
You can access an array element by referring to its index number inside square brackets.
val cars = arrayOf("Volvo", "BMW", "Ford", "Mazda")
println(cars[0]) // Outputs: Volvo
Note: Like Strings, array indexes start from 0: [0]
is the first
element, [1]
is the second, and so on.
To modify a specific element in an array, assign a new value using the index number:
val cars = arrayOf("Volvo", "BMW", "Ford", "Mazda")
cars[0] = "Opel"
println(cars[0]) // Outputs: Opel
To find out how many elements an array contains, use the size property:
val cars = arrayOf("Volvo", "BMW", "Ford", "Mazda")
println(cars.size) // Outputs: 4
You can use the in operator to check whether an element exists in an array.
val cars = arrayOf("Volvo", "BMW", "Ford", "Mazda")
if ("Volvo" in cars) {
println("It exists!")
} else {
println("It does not exist.")
}
It exists!
When working with arrays, you often need to loop through all elements. You can use the for loop to iterate through an array.
val cars = arrayOf("Volvo", "BMW", "Ford", "Mazda")
for (x in cars) {
println(x)
}
Volvo
BMW
Ford
Mazda
Often when working with arrays, you need to loop through all elements.
To loop through array elements, use the for loop together with the in operator.
In this example, we loop through a list of car brands and print each element:
val cars = arrayOf("Volvo", "BMW", "Ford", "Mazda")
for (x in cars) {
println(x)
}
Volvo
BMW
Ford
Mazda
You can loop through all kinds of arrays. In the example above, we used an array of strings.
In this example, we loop through an array of integers:
val nums = arrayOf(1, 5, 10, 15, 20)
for (x in nums) {
println(x)
}
1
5
10
15
20
Unlike Java and other programming languages, there is **no** traditional for loop in Kotlin.
In Kotlin, the for loop is used to loop through arrays, ranges, and other things that contain a countable number of values.
With the for loop, you can also create ranges of values using the .. operator.
You can loop through the entire alphabet or any subset of characters using a range.
for (chars in 'a'..'x') {
println(chars)
}
a
b
c
...
x
Note: The first and last value are included in the range.
You can also create ranges of numbers:
for (nums in 5..15) {
println(nums)
}
5
6
7
...
15
You can use the in operator to check if a value exists in an array or range.
val nums = arrayOf(2, 4, 6, 8)
if (2 in nums) {
println("It exists!")
} else {
println("It does not exist.")
}
It exists!
val cars = arrayOf("Volvo", "BMW", "Ford", "Mazda")
if ("Volvo" in cars) {
println("It exists!")
} else {
println("It does not exist.")
}
It exists!
Use the break keyword to stop a loop when a specific condition is met.
for (nums in 5..15) {
if (nums == 10) {
break
}
println(nums)
}
5
6
7
8
9
Use the continue keyword to skip a specific value and proceed to the next iteration.
for (nums in 5..15) {
if (nums == 10) {
continue
}
println(nums)
}
5
6
7
8
9
11
12
...
15
🎉 Now that you understand **Kotlin Ranges**, let’s move on to **Kotlin Functions** in the next section!
A function is a block of code that runs only when it is called.
You can pass data, known as parameters, into a function.
Functions are used to perform certain actions, and they are also known as methods.
You have already been using functions in Kotlin! The println() function is an example of a predefined function that prints text to the screen.
fun main() {
println("Hello World")
}
To create a function, use the fun keyword followed by the function name and parentheses ().
fun myFunction() {
println("I just got executed!")
}
To execute a function, simply call it by writing its name followed by parentheses ().
fun main() {
myFunction() // Call myFunction
}
// Outputs:
// I just got executed!
A function can be called multiple times.
fun main() {
myFunction()
myFunction()
myFunction()
}
// Outputs:
// I just got executed!
Functions can take input values known as parameters.
Parameters are defined inside the parentheses, and their types must be specified.
fun myFunction(fname: String) {
println(fname + " Doe")
}
fun main() {
myFunction("John")
myFunction("Jane")
myFunction("George")
}
// Outputs:
// John Doe
// Jane Doe
// George Doe
You can pass multiple parameters, separated by commas.
fun myFunction(fname: String, age: Int) {
println(fname + " is " + age)
}
fun main() {
myFunction("John", 35)
myFunction("Jane", 32)
myFunction("George", 15)
}
// Outputs:
// John is 35
// Jane is 32
// George is 15
Note: The number of arguments must match the number of parameters.
Functions can also return values instead of just printing them.
To return a value, use the return keyword and specify the return type.
fun myFunction(x: Int): Int {
return (x + 5)
}
fun main() {
var result = myFunction(3)
println(result)
}
// Outputs:
// 8
fun myFunction(x: Int, y: Int): Int {
return (x + y)
}
fun main() {
var result = myFunction(3, 5)
println(result)
}
// Outputs:
// 8
Kotlin allows a shorter syntax by using = instead of return.
fun myFunction(x: Int, y: Int) = x + y
fun main() {
var result = myFunction(3, 5)
println(result)
}
// Outputs:
// 8
Welcome to **Unit 5: Object-Oriented Programming (OOP)**. In this unit, we will learn about OOP principles in Kotlin, including classes, objects, inheritance, polymorphism, and more.
OOP stands for Object-Oriented Programming.
Procedural programming focuses on writing procedures or methods that perform operations on data, whereas object-oriented programming focuses on creating objects that contain both data and methods.
The DRY principle aims to reduce the repetition of code. It suggests extracting common functionality and reusing it instead of duplicating the same code multiple times.
Classes and objects are the two main components of object-oriented programming.
A class is a template for objects, while an object is an instance of a class.
Class | Objects |
---|---|
Fruit | 🍎 Apple, 🍌 Banana, 🥭 Mango |
Car | 🚗 Volvo, 🚙 Audi, 🚘 Toyota |
When individual objects are created, they inherit all the variables and methods from the class.
Everything in Kotlin is associated with classes and objects, along with their properties and functions. For example, in real life, a car is an object. A car has properties such as brand, weight, and color, and functions such as drive and brake.
A class is like an object constructor or a "blueprint" for creating objects.
To create a class, use the class keyword, followed by the name of the class:
class Car {
var brand = ""
var model = ""
var year = 0
}
A property is essentially a variable that belongs to the class.
It is considered best practice to start the name of a class with an uppercase letter for better readability.
Now we can use the Car class to create objects.
In the example below, we create an object of Car called c1, and then access its properties using the dot syntax (.):
// Create a c1 object of the Car class
val c1 = Car()
// Access the properties and add values
c1.brand = "Ford"
c1.model = "Mustang"
c1.year = 1969
println(c1.brand) // Outputs Ford
println(c1.model) // Outputs Mustang
println(c1.year) // Outputs 1969
You can create multiple objects of a single class:
val c1 = Car()
c1.brand = "Ford"
c1.model = "Mustang"
c1.year = 1969
val c2 = Car()
c2.brand = "BMW"
c2.model = "X5"
c2.year = 1999
println(c1.brand) // Ford
println(c2.brand) // BMW
In the previous chapter, we created an object of a class, and specified the properties inside the class like this:
class Car {
var brand = ""
var model = ""
var year = 0
}
fun main() {
val c1 = Car()
c1.brand = "Ford"
c1.model = "Mustang"
c1.year = 1969
}
In Kotlin, there's a faster way of doing this, by using a constructor.
A constructor is like a special function, and it is defined by using two parentheses () after the class name.
You can specify the properties inside the parentheses (just like passing parameters into a function).
The constructor will initialize the properties when you create an object of a class.
class Car(var brand: String, var model: String, var year: Int)
fun main() {
val c1 = Car("Ford", "Mustang", 1969)
}
Now it's even easier to specify multiple objects of the same class:
class Car(var brand: String, var model: String, var year: Int)
fun main() {
val c1 = Car("Ford", "Mustang", 1969)
val c2 = Car("BMW", "X5", 1999)
val c3 = Car("Tesla", "Model S", 2020)
println(c1.brand) // Ford
println(c2.brand) // BMW
println(c3.brand) // Tesla
}
You can also use functions inside a class to perform certain actions.
Create a drive() function inside the Car class and call it:
class Car(var brand: String, var model: String, var year: Int) {
// Class function
fun drive() {
println("Wrooom!")
}
}
fun main() {
val c1 = Car("Ford", "Mustang", 1969)
// Call the function
c1.drive()
}
Tip: When a function is declared inside a class, it is known as a class function, or member function.
Note: When an object of the class is created, it has access to all of the class functions.
Just like with regular functions, you can pass parameters to a class function.
Create two functions: drive() and speed(), and pass parameters to the speed() function:
class Car(var brand: String, var model: String, var year: Int) {
// Class function
fun drive() {
println("Wrooom!")
}
// Class function with parameters
fun speed(maxSpeed: Int) {
println("Max speed is: " + maxSpeed)
}
}
fun main() {
val c1 = Car("Ford", "Mustang", 1969)
// Call the functions
c1.drive()
c1.speed(200)
}
🎉 Now, we can add actions (functions) inside a class, making our objects even more powerful!
In Kotlin, it is possible to inherit class properties and functions from one class to another. We group the inheritance concept into two categories:
MyChildClass (subclass) inherits the properties from the MyParentClass class (superclass):
// Superclass (Parent)
open class MyParentClass {
val x = 5
}
// Subclass (Child)
class MyChildClass: MyParentClass() {
fun myFunction() {
println(x) // x is now inherited from the superclass
}
}
// Create an object of MyChildClass and call myFunction
fun main() {
val myObj = MyChildClass()
myObj.myFunction()
}
Inheritance is useful for code reusability: reuse properties and functions of an existing class when you create a new class.
The print()
statement in Python is used to show messages on the screen. It helps us display
words, numbers, or even results of calculations.
Why is print() important?
Example: Printing "Hello, World!"
print("Hello, World!")
Explanation: print
is the command that tells Python to display something. The
parentheses ()
hold what we want to print, and the text within the quotes is the string we
display.
Output: Hello, World!
Fun Experiment: Try changing the message inside the print()
function.
print("I love coding!")
print("Python is fun!")
Key Points to Remember:
print(10 + 5)
.print()
function can be used multiple times in your code.The input()
function in Python allows users to enter data into the program.
Why is input() important?
Example: Asking for a Name
name = input("What is your name? ")
print("Hello, " + name + "!")
Example Output:
What is your name? Alex
Hello, Alex!
Fun Experiment: Try asking different questions and responding based on input:
color = input("What is your favorite color? ")
print("Wow! " + color + " is a great color!")
Variables are like containers for storing data values. In Python, we use variables to store values like numbers, words, or even the results of calculations.
Why are variables important?
Example: Storing a Name
name = "Alice"
print("Hello, " + name + "!")
Variables can be used to store all sorts of data.
favorite_food = "Pizza"
print(favorite_food)
age = 12
height = 4.5
print(age)
print(height)
is_student = True
print(is_student)
Types of Values You Can Store:
Updating Variables:
age = 10
print("I am", age, "years old.")
age = 11 # Changing the value
print("Now I am", age, "years old.")
Combining input() with Variables:
name = input("What is your name? ")
print("Nice to meet you, " + name + "!")
Rules for Naming Variables:
Fun Experiment: Try changing values of variables and see how it affects your program.
Data types in Python specify the different types of values that can be stored and manipulated within a program.
Why Data Types are Important:
Common Data Types:
Example of Each Data Type:
# String Example
name = "Alice"
print("Name:", name)
# Integer Example
age = 30
print("Age:", age)
# Float Example
height = 5.9
print("Height:", height)
# Boolean Example
is_student = True
print("Is student:", is_student)
Type Conversion: Changing the data type of a value to another, such as converting a string to an integer.
number_string = "123"
number_int = int(number_string)
print("Converted Number:", number_int)
Experiment with Data Types: Try creating variables of each type and see how Python handles them.
A function in Python is like a magic box that performs a specific task when you call it. Functions help us organize code, avoid repetition, and make our programs easier to read.
Why Are Functions Important?
Creating a Function (Defining a Function)
To create a function in Python, we use the def
keyword, followed by the function
name and parentheses ()
.
def say_hello():
print("Hello, World!")
Output:
Hello, World!
Calling a Function
Once a function is defined, you can call it by using its name followed by parentheses.
say_hello() # This will call the function and run its code.
Output:
Hello, World!
Functions with Parameters (Inputs)
A function can take inputs (called parameters) to perform a task based on the input.
def greet(name):
print("Hello, " + name + "!")
greet("Alice")
greet("Bob")
Output:
Hello, Alice!
Hello, Bob!
Functions with Return Values
Instead of just printing, a function can return a value to be used later.
def multiply(x, y):
return x * y
result = multiply(4, 3)
print(result)
Output:
12
Default Parameters
Functions can have default values for parameters. If no value is provided when calling the function, the default is used.
def greet(name="friend"):
print("Hello, " + name + "!")
greet() # Uses the default value
greet("Alice") # Uses the provided value
Output:
Hello, friend!
Hello, Alice!
Using Functions with input()
We can take user input and pass it as an argument to a function.
def favorite_color(color):
print("Wow! " + color + " is a beautiful color!")
user_color = input("Enter your favorite color: ")
favorite_color(user_color)
Calling Functions Inside Functions
A function can call another function.
def say_hello():
print("Hello!")
def greet_person(name):
say_hello()
print("Nice to meet you, " + name + "!")
greet_person("Alice")
Output:
Hello!
Nice to meet you, Alice!
Breaking a Problem into Functions
Functions can be used to divide a big problem into smaller tasks.
def calculate_area(length, width):
return length * width
def display_area(length, width):
area = calculate_area(length, width)
print("The area is:", area)
display_area(5, 3)
Output:
The area is: 15
Fun Experiment
Try creating a function that calculates the square of a number:
def square(number):
return number * number
print(square(4)) # Output: 16
print(square(7)) # Output: 49
Key Points to Remember About Functions
def
keyword to define a function.Operators in Python are special symbols or keywords that perform actions on values. They are used for calculations, comparisons, and logic-based tasks.
+ Add: 5 + 3 = 8
- Subtract: 10 - 4 = 6
* Multiply: 6 * 2 = 12
/ Divide: 8 / 2 = 4.0
// Floor Division: 9 // 2 = 4
% Modulus: 10 % 3 = 1
** Exponentiation: 2 ** 3 = 8
== Equal to: 5 == 5 results in True
!= Not equal to: 4 != 3 results in True
> Greater than: 10 > 5 results in True
< Less than: 3 < 5 results in True
>= Greater or equal to: 6 >= 6 results in True
<= Less or equal to: 2 <= 5 results in True
and Both conditions true: (x > 5 and x < 10) results in True
or At least one condition true: (x > 5 or x < 2) results in True
not Reverses the condition: not(x > 5) results in False
x = 5
x += 3 # x = x + 3
x -= 2 # x = x - 2
x *= 4 # x = x * 4
x /= 2 # x = x / 2
fruits = ["apple", "banana", "cherry"]
"apple" in fruits # Returns True
"grape" not in fruits # Returns True
Python follows a specific order of operations which is similar to that in mathematics. This determines how expressions are evaluated.
Try combining different types of operators to see the effect:
x = 10
y = 3
print(x + y) # Addition
print(x > y and x < 15) # Logical
print("apple" in ["apple", "orange"]) # Membership
Key Points to Remember: Understanding different operators and their precedence is crucial for writing effective Python code.
String concatenation is the process of joining two or more strings together. This is useful for creating meaningful sentences, combining user inputs, or formatting text.
We can concatenate strings in Python using the +
operator.
greeting = "Hello"
name = "Alice"
message = greeting + " " + name
print(message)
Output: Hello Alice
Adding Spaces While Concatenating
If you want spaces between words, you need to add them manually as part of the string.
word1 = "Python"
word2 = "is fun"
sentence = word1 + " " + word2
print(sentence)
Output: Python is fun
We can mix strings with variables to create personalized outputs.
name = "Bob"
age = 12
message = "Hi, my name is " + name + " and I am " + str(age) + " years old."
print(message)
Output: Hi, my name is Bob and I am 12 years old.
An f-string
is an easier way to concatenate strings and variables. Just add an f
before the string and put variables inside curly braces {}
.
name = "Charlie"
age = 15
message = f"My name is {name} and I am {age} years old."
print(message)
Output: My name is Charlie and I am 15 years old.
.format()
for ConcatenationAnother way to concatenate strings is by using the .format()
method.
name = "Alice"
age = 10
message = "My name is {} and I am {} years old.".format(name, age)
print(message)
Output: My name is Alice and I am 10 years old.
You can use concatenation inside loops to build strings dynamically.
words = ["Python", "is", "fun"]
sentence = ""
for word in words:
sentence += word + " "
print(sentence)
Output: Python is fun
+
operator to join strings.f-strings
or .format()
for easier concatenation with variables.str()
before concatenating.print("Hello" + "World") # Output: HelloWorld
age = 10
print("I am " + age) # Error: TypeError
print("I am " + str(age)) # Correct way
Try creating a dynamic greeting program:
name = input("What is your name? ")
hobby = input("What is your favorite hobby? ")
print("Hi " + name + "! It's great to know that you love " + hobby + ".")
Output (Example): What is your name? Alice
What is your favorite hobby? painting
Hi
Alice! It's great to know that you love painting.
Conditional statements in Python allow programs to respond differently based on conditions.
Python includes several types of conditional statements:
age = 15
if age > 12:
print("You are a teenager!")
Output: You are a teenager!
age = 10
if age > 12:
print("You are a teenager!")
else:
print("You are still a child!")
Output: You are still a child!
marks = 85
if marks >= 90:
print("You got an A!")
elif marks >= 75:
print("You got a B!")
else:
print("You need to work harder.")
Output: You got a B!
Nested if statements check conditions within conditions.
age = 18
has_ticket = True
if age >= 18:
if has_ticket:
print("You can enter the movie theater!")
else:
print("You need a ticket!")
else:
print("You're too young to watch this movie.")
Output: You can enter the movie theater!
We can use user input to make decisions.
password = input("Enter the password: ")
if password == "python123":
print("Access granted!")
else:
print("Wrong password!")
Create a simple quiz using conditional statements:
answer = input("What is the capital of Kenya? ")
if answer.lower() == "nairobi":
print("Correct!")
else:
print("Oops! The correct answer is Nairobi.")
Loops in Python allow repetitive actions to be executed multiple times without rewriting the code.
Python supports several types of loops:
for i in range(1, 6):
print(i)
Outputs numbers from 1 to 5.
fruits = ["apple", "banana", "cherry"]
for fruit in fruits:
print(fruit)
Outputs each fruit in the list.
count = 1
while count <= 5:
print(count)
count += 1
Counts from 1 to 5.
break is used to exit a loop prematurely, while continue skips to the next iteration.
for num in range(1, 10):
if num == 5:
break
print(num)
Prints numbers 1 to 4 and then stops.
for num in range(1, 6):
if num == 3:
continue
print(num)
Skips number 3 and prints 1, 2, 4, 5.
Loops can be nested inside other loops to perform multi-level actions.
for i in range(1, 4):
for j in range(1, 4):
print(f"i = {i}, j = {j}")
Prints a combination of i and j values.
Create a countdown using a while loop.
countdown = 5
while countdown > 0:
print(countdown)
countdown -= 1
print("Happy New Year!")
Counts down from 5 and then celebrates.
A list in Python is a collection which is ordered and changeable. In Python, lists are written with square brackets.
Lists are created using square brackets:
fruits = ["apple", "banana", "cherry"]
print(fruits)
Outputs: ['apple', 'banana', 'cherry']
You can access the list items by referring to the index number:
print(fruits[0]) # Outputs 'apple'
print(fruits[2]) # Outputs 'cherry'
Change the value of a specific item by referring to its index number:
fruits[1] = "blueberry"
print(fruits) # Outputs ['apple', 'blueberry', 'cherry']
Add items to the end of the list using the append() method or at the specified index using the insert() method:
fruits.append("orange") # Adds 'orange' to the end
fruits.insert(1, "mango") # Inserts 'mango' at index 1
print(fruits) # Outputs ['apple', 'mango', 'blueberry', 'cherry', 'orange']
Remove specified items using the remove() method or remove items by index using the pop() method or del keyword:
fruits.remove("mango") # Removes 'mango'
print(fruits) # Outputs ['apple', 'blueberry', 'cherry', 'orange']
fruits.pop(1) # Removes item at index 1
print(fruits) # Outputs ['apple', 'cherry', 'orange']
del fruits[0] # Deletes item at index 0
print(fruits) # Outputs ['cherry', 'orange']
Iterate over the items of the list using a for loop:
for fruit in fruits:
print(fruit) # Outputs each fruit in the list
Check if an item exists within a list using the in keyword:
if "apple" in fruits:
print("Apple is in the list!") # Confirms that apple is in the list
Use the len() method to get the number of items in a list:
print(len(fruits)) # Outputs the number of items in the list
Sort the list items alphabetically in ascending or descending order using the sort() method:
numbers = [4, 1, 3, 2]
numbers.sort() # Sorts the list in ascending order
print(numbers) # Outputs [1, 2, 3, 4]
numbers.sort(reverse=True) # Sorts the list in descending order
print(numbers) # Outputs [4, 3, 2, 1]
Combine or merge two lists by using the + operator or the extend() method:
list1 = ["cat", "dog"]
list2 = ["bird", "fish"]
combined_list = list1 + list2
print(combined_list) # Outputs ['cat', 'dog', 'bird', 'fish']
Create a list of your favorite hobbies and print them using a loop:
hobbies = ["reading", "drawing", "cycling"]
for hobby in hobbies:
print("I love " + hobby) # Outputs each hobby in a friendly format
A tuple in Python is a collection of items that cannot be changed (immutable). Tuples are written with round brackets and the items are separated by commas.
Tuples are created using round brackets:
fruits = ("apple", "banana", "cherry")
print(fruits)
Outputs: ('apple', 'banana', 'cherry')
Items in a tuple can be accessed by their index, similar to lists:
print(fruits[0]) # Outputs 'apple'
print(fruits[2]) # Outputs 'cherry'
Tuples are immutable, so trying to change them will result in an error:
# This will raise an error
fruits[1] = "blueberry"
You can loop through a tuple using a for loop:
colors = ("red", "blue", "green")
for color in colors:
print(color)
The number of items in a tuple can be determined using the len() function:
print(len(fruits)) # Outputs 3
Two or more tuples can be combined using the + operator:
tuple1 = ("red", "blue")
tuple2 = ("green", "yellow")
combined_tuple = tuple1 + tuple2
print(combined_tuple)
Outputs: ('red', 'blue', 'green', 'yellow')
Parts of a tuple can be accessed using slicing:
numbers = (10, 20, 30, 40, 50)
print(numbers[1:4]) # Outputs (20, 30, 40)
Check if an item exists within a tuple using the in keyword:
if "banana" in fruits:
print("Banana is in the tuple!")
If you need to modify a tuple, you can convert it to a list:
fruits_list = list(fruits)
fruits_list.append("orange")
fruits = tuple(fruits_list)
print(fruits)
Outputs: ('apple', 'banana', 'cherry', 'orange')
Tuples can be used to assign multiple values at once:
person = ("Alice", 25, "Engineer")
name, age, profession = person
print(name) # Outputs 'Alice'
print(age) # Outputs 25
print(profession) # Outputs 'Engineer'
Try creating a tuple with your favorite foods and print them:
foods = ("pizza", "burger", "pasta")
for food in foods:
print("I love " + food)
Dictionaries in Python are collections of key-value pairs that function like a real-life dictionary, allowing you to quickly retrieve information by looking up a key.
Dictionaries are defined with curly braces {}
with items stored as key-value pairs separated by
colons.
student = {
"name": "Alice",
"age": 12,
"grade": "7th"
}
print(student)
This outputs: {'name': 'Alice', 'age': 12, 'grade': '7th'}
Access dictionary values by key using brackets []
or the .get()
method.
print(student["name"]) # Outputs 'Alice'
print(student.get("age")) # Outputs 12
Add or update dictionary items by assigning a value to a key.
student["grade"] = "8th" # Updates if exists, adds if not
print(student)
Remove items using .pop()
, del
, or .clear()
.
student.pop("age") # Removes 'age'
del student["grade"] # Removes 'grade'
student.clear() # Empties dictionary
Iterate through keys, values, or both using loops.
for key in student:
print(key) # Prints all keys
for value in student.values():
print(value) # Prints all values
for key, value in student.items():
print(key, ":", value) # Prints all key-value pairs
Check for the existence of a key using in
.
if "name" in student:
print("Name is available!")
Use methods like keys()
, values()
, and items()
to interact with
dictionaries.
print(student.keys()) # Outputs all keys
print(student.values()) # Outputs all values
print(student.items()) # Outputs all items
Dictionaries can contain other dictionaries, allowing complex data structures.
school = {
"student1": {"name": "Alice", "age": 12},
"student2": {"name": "Bob", "age": 14}
}
print(school["student1"]["name"]) # Outputs 'Alice'
Create and manipulate your own dictionary with hobbies, friends, or any other interests.
hobbies = {
"hobby1": "reading",
"hobby2": "drawing"
}
for hobby, description in hobbies.items():
print("I enjoy " + description)
Sets in Python are collections of unique items that are unordered and do not allow duplicates. They are ideal for storing distinct values and performing set operations like unions and intersections.
Sets can be created using curly braces {}
or the set()
function. Here is how you
can initialize a set:
fruits = {"apple", "banana", "cherry"}
print(fruits)
numbers = set([1, 2, 3, 3, 4]) # Duplicates are removed
print(numbers)
While sets do not support indexing, you can loop through them or ask if a value exists:
for fruit in fruits:
print(fruit)
Use add()
to add single items and update()
for multiple items:
fruits.add("orange")
fruits.update(["mango", "grape"])
print(fruits)
Items can be removed using remove()
, discard()
, and pop()
:
fruits.remove("banana")
fruits.discard("cherry")
random_fruit = fruits.pop()
fruits.clear()
Perform mathematical set operations like union, intersection, and difference:
set1 = {1, 2, 3}
set2 = {2, 3, 4}
print(set1 | set2) # Union
print(set1 & set2) # Intersection
print(set1 - set2) # Difference
print(set1 ^ set2) # Symmetric Difference
While sets cannot contain other sets due to their unhashable nature, they can contain immutable versions called frozensets:
nested_set = {frozenset({1, 2}), frozenset({3, 4})}
print(nested_set)
Create sets of your favorite movies or books and use set operations to combine them with friends' favorites:
my_favorites = {"Star Wars", "The Matrix"}
friends_favorites = {"The Matrix", "Inception"}
print(my_favorites | friends_favorites) # Find all unique favorites
String manipulation involves altering, formatting, and working with strings to achieve desired outputs, using Python's rich set of string handling capabilities.
Method | Description | Example |
---|---|---|
lower() |
Converts a string to lowercase. | "HELLO".lower() results in "hello" |
upper() |
Converts a string to uppercase. | "hello".upper() results in "HELLO" |
capitalize() |
Capitalizes the first letter of the string. | "python".capitalize() results in "Python" |
strip() |
Removes any leading/trailing whitespace from the string. | " hello ".strip() results in "hello" |
replace(old, new) |
Replaces all occurrences of a substring. | "cats".replace("c", "b") results in "bats" |
split(delimiter) |
Splits the string into a list based on the delimiter. | "a,b,c".split(",") results in ['a', 'b', 'c'] |
join(list) |
Joins the elements of a list into a single string with the string as the delimiter. | " ".join(['Hello', 'World']) results in "Hello World" |
word = "Python"
print(word[0]) # Output: 'P'
print(word[-1]) # Output: 'n'
print(word[0:2]) # Output: 'Py'
print(word[:2]) # Output: 'Py'
print(word[2:]) # Output: 'thon'
text = "python is fun"
print(text.upper()) # Output: 'PYTHON IS FUN'
print(text.capitalize()) # Output: 'Python is fun'
text = "I like cats"
new_text = text.replace("cats", "dogs")
print(new_text) # Output: 'I like dogs'
name = "Alice"
age = 12
print(f"My name is {name}, and I am {age} years old.") # Using f-string
print("My name is {}, and I am {} years old.".format(name, age)) # Using .format()
Try modifying a user's input and combining various string methods:
name = input("What is your name? ").strip().capitalize()
hobby = input("What is your favorite hobby? ")
print(f"Hello, {name}! It's great to know that you enjoy {hobby.lower()}!")
File Handling in Python allows us to work with files, enabling operations like reading, writing, and creating new files.
To open a file, we use the open()
function with the filename and the mode (e.g., "r" for read,
"w" for write).
file = open("filename.txt", "r")
content = file.read()
print(content)
file.close()
file = open("example.txt", "r")
for line in file:
print(line.strip())
file.close()
file = open("example.txt", "w")
file.write("Hello, this is written to a file!\n")
file.close()
file = open("example.txt", "a")
file.write("Adding this line to the end of the file.")
file.close()
file = open("newfile.txt", "x")
file.write("New file created!")
file.close()
We use the os
module to check if a file exists and delete it:
import os
if os.path.exists("example.txt"):
os.remove("example.txt")
print("File deleted!")
else:
print("The file does not exist.")
with
Statement for File Handling:The with
statement simplifies file handling by automatically taking care of closing the file
after its suite finishes:
with open("example.txt", "r") as file:
content = file.read()
print(content)
Create a simple program to take user input and write it to a file:
with open("userdata.txt", "w") as file:
name = input("Enter your name: ")
hobby = input("Enter your hobby: ")
file.write(f"Name: {name}, Hobby: {hobby}")
print("Data saved to file!")
Exception handling in Python allows us to deal with errors during the execution of a program. It helps prevent the program from crashing and allows for more graceful error handling.
try:
# Code that might raise an error
risky_code
except:
# Code to handle the error
handle_error
try:
result = 10 / 0
except:
print("Oops! You can't divide by zero.")
Output: "Oops! You can't divide by zero."
try:
numbers = [1, 2, 3]
print(numbers[5])
except IndexError:
print("Index out of range!")
Output: "Index out of range!"
The else
block runs if no exceptions are raised, and the finally
block runs
regardless of what happens in the try
and except
.
try:
file = open("example.txt", "r")
content = file.read()
except FileNotFoundError:
print("File not found!")
finally:
print("This block always runs.")
Output: Depending on if the file exists, either "File not found!" or the file content, followed by "This block always runs."
try:
x = int("hello") # Causes ValueError
result = 10 / 0 # Causes ZeroDivisionError
except ValueError:
print("Invalid value!")
except ZeroDivisionError:
print("Cannot divide by zero!")
Output: "Invalid value!"
Create a simple program that handles exceptions:
try:
number = int(input("Enter a number: "))
print("You entered:", number)
except ValueError:
print("That's not a valid number!")
These examples show how to manage different types of errors gracefully without letting the program crash unexpectedly.
Classes and Objects are fundamental to understanding Object-Oriented Programming (OOP) in Python, allowing data and functions to be encapsulated into a single entity.
A class is like a blueprint for creating objects, defining the properties and behaviors that the objects will have.
class Car:
def drive(self):
print("The car is driving!")
Objects are instances of a class, created from the class's blueprint.
my_car = Car()
my_car.drive()
Output: "The car is driving!"
__init__
MethodThe __init__
method initializes new objects by setting initial values for the object's
properties.
class Car:
def __init__(self, brand, color):
self.brand = brand
self.color = color
def describe(self):
print(f"This car is a {self.color} {self.brand}.")
my_car = Car("Toyota", "red")
my_car.describe()
Output: "This car is a red Toyota."
Attributes of objects can be accessed and modified directly using the dot notation.
my_car = Car("Honda", "blue")
print(my_car.brand) # Output: Honda
my_car.color = "green"
print(my_car.color) # Output: green
Methods are functions defined within a class that describe the behaviors of the class's objects.
class Dog:
def __init__(self, name):
self.name = name
def bark(self):
print(f"{self.name} is barking!")
my_dog = Dog("Buddy")
my_dog.bark()
Output: "Buddy is barking!"
self
The self
keyword is used in methods to refer to the object on which the method is being called.
class Person:
def __init__(self, name):
self.name = name
def greet(self):
print(f"Hello, my name is {self.name}.")
Create a class for your favorite animal and make it perform an action.
class Animal:
def __init__(self, name, sound):
self.name = name
self.sound = sound
def make_sound(self):
print(f"The {self.name} goes {self.sound}!")
cat = Animal("cat", "meow")
cat.make_sound()
Output: "The cat goes meow!"
Modules and packages help organize Python code into manageable parts, making it easier to maintain and reuse code across different projects.
A module is a Python file containing functions, classes, or variables. Modules allow you to logically organize your Python code.
# math_tools.py
def add(a, b):
return a + b
def subtract(a, b):
return a - b
Modules can be imported into other modules or scripts, enabling you to use functions or classes defined in them.
import math_tools
result = math_tools.add(5, 3)
print(result) # Output: 8
Python includes several built-in modules that provide useful functionalities like mathematical operations and random number generations.
import math
print(math.sqrt(16)) # Output: 4.0
import random
print(random.randint(1, 10)) # Random number between 1 and 10
You can choose to import specific attributes or functions from a module, which is useful when you only need a part of the module.
from math import sqrt, pi
print(sqrt(25)) # Output: 5.0
print(pi) # Output: 3.141592653589793
A package is a directory of Python scripts, each of which is a module that can include functions, classes, and variables.
To create a package, make a directory and add an `__init__.py` file to it, then place your module files in the directory.
from my_package.greetings import say_hello
from my_package.math_tools import multiply
print(say_hello("Alice")) # Output: Hello, Alice!
print(multiply(3, 4)) # Output: 12
External packages can be installed and managed with `pip`, Python's package installer.
pip install requests
Create a package that includes several modules to handle different tasks. For example, a package for handling various math operations like addition, subtraction, and multiplication.
List comprehensions provide a concise way to create lists. They can simplify code that would otherwise use loops and conditionals.
new_list = [expression for item in iterable if condition]
Traditionally, you might use a loop to create a list by appending items one by one.
numbers = [1, 2, 3, 4, 5]
squares = []
for num in numbers:
squares.append(num ** 2)
print(squares) # Output: [1, 4, 9, 16, 25]
A list comprehension can achieve the same result with less code.
numbers = [1, 2, 3, 4, 5]
squares = [num ** 2 for num in numbers]
print(squares) # Output: [1, 4, 9, 16, 25]
You can add conditions to filter items.
numbers = [1, 2, 3, 4, 5, 6]
evens = [num for num in numbers if num % 2 == 0]
print(evens) # Output: [2, 4, 6]
List comprehensions can also include an if-else condition to perform different operations based on the condition.
numbers = [1, 2, 3, 4, 5]
result = ["even" if num % 2 == 0 else "odd" for num in numbers]
print(result) # Output: ['odd', 'even', 'odd', 'even', 'odd']
List comprehensions can be used to manipulate strings efficiently.
words = ["hello", "world", "python"]
uppercase_words = [word.upper() for word in words]
print(uppercase_words) # Output: ['HELLO', 'WORLD', 'PYTHON']
You can incorporate multiple loops within a list comprehension for more complex operations.
numbers = [1, 2, 3]
pairs = [(x, y) for x in numbers for y in numbers]
print(pairs) # Output: [(1, 1), (1, 2), (1, 3), (2, 1), (2, 2), (2, 3), (3, 1), (3, 2), (3, 3)]
You can also use `range()` to create lists that represent a sequence of numbers.
squares = [x ** 2 for x in range(1, 6)]
print(squares) # Output: [1, 4, 9, 16, 25]
Conditions can be combined with loops for filtering and applying complex logic.
numbers = range(1, 11)
even_squares = [x ** 2 for x in numbers if x % 2 == 0]
print(even_squares) # Output: [4, 16, 36, 64, 100]
Experiment with list comprehensions by using them to transform a list of names or to create patterns.
names = ["Alice", "Bob", "Alex", "Charlie"]
a_names = [name.lower() for name in names if name.startswith("A")]
print(a_names) # Output: ['alice', 'alex']
Lambda functions in Python are small, anonymous functions defined with the lambda keyword. They can have any number of arguments but only one expression.
lambda arguments: expression
Here is an example of a simple lambda function that adds two numbers:
add = lambda a, b: a + b
print(add(3, 5)) # Output: 8
Lambda functions are commonly used with other functions, especially with map()
,
filter()
, and sort()
to apply functions to sequences.
map()
numbers = [1, 2, 3, 4]
squared = list(map(lambda x: x ** 2, numbers))
print(squared) # Output: [1, 4, 9, 16]
filter()
numbers = [1, 2, 3, 4, 5, 6]
evens = list(filter(lambda x: x % 2 == 0, numbers))
print(evens) # Output: [2, 4, 6]
sort()
names = ["Alice", "Bob", "Charlie"]
sorted_names = sorted(names, key=lambda name: len(name))
print(sorted_names) # Output: ['Bob', 'Alice', 'Charlie']
Lambda functions can also have default arguments:
add = lambda x, y=5: x + y
print(add(3)) # Output: 8 (3 + 5)
print(add(3, 7)) # Output: 10 (3 + 7)
Here's a fun experiment to try combining lambda functions with map()
and filter()
:
numbers = [1, 2, 3, 4, 5, 6]
squared_evens = list(map(lambda x: x ** 2, filter(lambda x: x % 2 == 0, numbers)))
print(squared_evens) # Output: [4, 16, 36]
Recursion is a programming technique where a function calls itself to solve smaller instances of the same problem. It simplifies complex problems by dividing them into more manageable parts.
A recursive function consists of two parts: a base case that ends the recursion, and a recursive case that calls the function itself.
def countdown(n):
if n == 0:
print("Blast off!")
else:
print(n)
countdown(n - 1)
countdown(5)
This function prints numbers starting from the given number down to zero. When it reaches zero, it prints "Blast off!"
def factorial(n):
if n == 1:
return 1
else:
return n * factorial(n - 1)
print(factorial(5)) # Output: 120
The factorial of a number is the product of all positive integers up to that number. This example uses recursion to calculate the factorial of 5.
def fibonacci(n):
if n == 0:
return 0
elif n == 1:
return 1
else:
return fibonacci(n - 1) + fibonacci(n - 2)
print(fibonacci(6)) # Output: 8
The Fibonacci sequence is a series of numbers where each number is the sum of the two preceding ones. This function calculates the nth Fibonacci number.
def infinite():
infinite()
This is an example of infinite recursion, which will cause a crash or a 'RecursionError' due to the stack overflow.
def sum_numbers(n):
if n == 0:
return 0
else:
return n + sum_numbers(n - 1)
print(sum_numbers(5)) # Output: 15
This recursive function calculates the sum of all numbers from 1 to n. It's a great way to understand how recursion works by breaking down the addition process.
An API (Application Programming Interface) allows two applications to communicate with each other. For instance, fetching weather information for a specific location from a weather service.
The requests
library is a versatile HTTP client for Python that simplifies working with HTTP
requests.
pip install requests
import requests
response = requests.get("https://api.github.com")
print(response.status_code) # Status code check
print(response.json()) # Parsing JSON response
Most APIs return data in JSON format, which can easily be converted to Python data structures for manipulation.
params = {
"q": "search_query",
"appid": "your_api_key"
}
response = requests.get("https://api.example.com/search", params=params)
data = response.json()
print(data)
response = requests.get("https://api.example.com/data")
if response.status_code == 200:
print("Success!")
else:
print("Error occurred: ", response.status_code)
data = {"key": "value"}
response = requests.post("https://api.example.com/submit", json=data)
print(response.text)
Some APIs require authentication using tokens or API keys, which should be included in request headers.
headers = {
"Authorization": "Bearer your_api_key"
}
response = requests.get("https://api.example.com/protected", headers=headers)
print(response.json())
Combine knowledge of GET requests, query parameters, and JSON handling to fetch and display weather data.
api_url = "https://api.openweathermap.org/data/2.5/weather"
params = {
"q": "London",
"appid": "your_api_key"
}
response = requests.get(api_url, params=params)
weather = response.json()
print("Weather in London: ", weather["main"]["temp"])
Create a simple application that fetches daily quotes from an API and displays them.
response = requests.get("https://api.quotable.com/random")
quote = response.json()
print(quote["content"])
Data visualization involves creating visual representations of data to make it easier to understand and interpret. It's a powerful way to communicate information clearly and effectively.
Matplotlib is a popular Python library for creating static, interactive, and animated visualizations in Python.
pip install matplotlib
Here's how to create a simple line plot showing a linear relationship:
import matplotlib.pyplot as plt
x = [1, 2, 3, 4, 5]
y = [2, 3, 5, 7, 11]
plt.plot(x, y)
plt.title("Simple Line Plot")
plt.xlabel("X Axis")
plt.ylabel("Y Axis")
plt.show()
Bar charts are great for comparing categorical data:
categories = ['Red', 'Blue', 'Green', 'Purple']
values = [50, 80, 60, 90]
plt.bar(categories, values)
plt.title("Bar Chart Example")
plt.xlabel("Colors")
plt.ylabel("Values")
plt.show()
Pie charts show parts of a whole as slices:
labels = ['Apples', 'Bananas', 'Cherries', 'Dates']
sizes = [15, 30, 45, 10]
plt.pie(sizes, labels=labels, autopct='%1.1f%%')
plt.axis('equal') # Equal aspect ratio ensures that pie is drawn as a circle.
plt.show()
Histograms help visualize the distributions of data points:
data = [1, 2, 2, 3, 3, 3, 3, 4, 4, 5]
plt.hist(data, bins=5)
plt.title("Histogram")
plt.show()
You can customize the look of your plots with different colors, markers, and line styles:
plt.plot(x, y, marker='o', color='red', linestyle='--')
plt.title("Customized Line Plot")
plt.xlabel("X Axis")
plt.ylabel("Y Axis")
plt.grid(True)
plt.show()
Try creating a scatter plot to explore the relationship between two variables:
x = [5, 2, 9, 4, 7]
y = [10, 5, 8, 4, 2]
plt.scatter(x, y)
plt.title("Scatter Plot Example")
plt.xlabel("Independent Variable")
plt.ylabel("Dependent Variable")
plt.show()
Python projects help apply various concepts learned throughout Python tutorials, combining loops, conditionals, functions, and APIs to solve real-world problems and create functional applications.
def quiz():
questions = {
"What is the capital of Kenya?": "Nairobi",
"What is 2 + 2?": "4",
"Who wrote 'Harry Potter'?": "J.K. Rowling"
}
score = 0
for question, answer in questions.items():
user_answer = input(question + " ")
if user_answer.lower() == answer.lower():
print("Correct!")
score += 1
else:
print(f"Wrong! The correct answer is {answer}.")
print(f"You got {score}/{len(questions)} questions right!")
quiz()
def calculator():
print("Simple Calculator")
print("Choose an operation: +, -, *, /")
operation = input("Enter operation: ")
num1 = float(input("Enter the first number: "))
num2 = float(input("Enter the second number: "))
if operation == "+":
print(f"The result is: {num1 + num2}")
elif operation == "-":
print(f"The result is: {num1 - num2}")
elif operation == "*":
print(f"The result is: {num1 * num2}")
elif operation == "/":
if num2 != 0:
print(f"The result is: {num1 / num2}")
else:
print("Error! Division by zero.")
else:
print("Invalid operation.")
calculator()
import random
def number_guessing_game():
number = random.randint(1, 100)
print("Guess the number between 1 and 100!")
while True:
guess = int(input("Enter your guess: "))
if guess < number:
print("Too low!")
elif guess > number:
print("Too high!")
else:
print("Congratulations! You guessed the number!")
break
number_guessing_game()
def to_do_list():
tasks = []
while True:
print("\nTo-Do List:")
for i, task in enumerate(tasks, start=1):
print(f"{i}. {task}")
print("\nOptions: 1. Add Task 2. Remove Task 3. Exit")
choice = input("Choose an option: ")
if choice == "1":
task = input("Enter a new task: ")
tasks.append(task)
elif choice == "2":
task_number = int(input("Enter the task number to remove: "))
if 0 < task_number <= len(tasks):
tasks.pop(task_number - 1)
else:
print("Invalid task number.")
elif choice == "3":
print("Goodbye!")
break
else:
print("Invalid choice. Please try again.")
to_do_list()
import requests
def weather_app():
api_key = "your_api_key" # Replace with your API key
city = input("Enter the city name: ")
url = f"http://api.openweathermap.org/data/2.5/weather?q={city}&appid={api_key}&units=metric"
response = requests.get(url)
if response.status_code == 200:
data = response.json()
print(f"City: {data['name']}")
print(f"Temperature: {data['main']['temp']}°C")
print(f"Weather: {data['weather'][0]['description']}")
else:
print("City not found. Please try again.")
weather_app()
This unit introduces the fundamentals of web development, covering front-end, back-end, and full-stack development.
Web development is the process of creating websites and web applications that run on the internet.
Website | Technology Used |
---|---|
React.js, Node.js, PHP | |
HTML, CSS, JavaScript, Python | |
Netflix | React.js, Node.js |
This section introduces HTML, its structure, and common tags used to build web pages.
HTML (**HyperText Markup Language**) is the foundation of all web pages. It provides the **structure** of a webpage using elements called **tags**.
A website like Wikipedia uses HTML for:
All HTML documents follow this structure:
<!DOCTYPE html>
<html lang="en">
<head>
<meta charset="UTF-8">
<meta name="viewport" content="width=device-width, initial-scale=1.0">
<title>My First Web Page</title>
</head>
<body>
<h1>Hello, World!</h1>
<p>Welcome to my first webpage.</p>
</body>
</html>
<!DOCTYPE html>
→ Declares the document as **HTML5**.<html>
→ The root of the HTML document.<head>
→ Contains **metadata** (title, character encoding,
mobile responsiveness).<title>
→ Sets the **title** of the webpage (appears in the
browser tab).<body>
→ Contains all the **visible content** (headings,
paragraphs, images, etc.).HTML provides **six heading levels**, from <h1>
(largest) to
<h6>
(smallest):
<h1>This is Heading 1</h1>
<h2>This is Heading 2</h2>
<h3>This is Heading 3</h3>
A paragraph is created using the <p>
tag:
<p>This is a paragraph of text.</p>
<br>
→ Adds a line break (moves text to a new line).<hr>
→ Creates a horizontal line.
<p>This is line 1.<br>This is line 2.</p>
<hr>
<p>This is another section.</p>
<a>
Tag)Links allow users to navigate to another webpage.
<a href="https://www.google.com">Visit Google</a>
The href
attribute specifies the **destination URL**.
<img>
Tag)Images enhance a webpage visually.
<img src="image.jpg" alt="Description of the image" width="300">
src
attribute specifies the **image location**.alt
attribute provides **alternative text** for accessibility.
width
and height
attributes adjust the **image
size**.<ul>
)Creates a bullet point list.
<ul>
<li>Apple</li>
<li>Banana</li>
<li>Cherry</li>
</ul>
<ol>
)Creates a numbered list.
<ol>
<li>Step 1</li>
<li>Step 2</li>
<li>Step 3</li>
</ol>
Tables organize data into rows and columns.
<table border="1">
<tr>
<th>Name</th>
<th>Age</th>
</tr>
<tr>
<td>Alice</td>
<td>25</td>
</tr>
</table>
<table>
→ Defines a table.<tr>
→ Table row.<th>
→ Table heading (bold).<td>
→ Table data (cell content).Forms allow user input (e.g., sign-up forms).
<form action="submit.php" method="post">
<label for="name">Name:</label>
<input type="text" id="name" name="name">
<label for="email">Email:</label>
<input type="email" id="email" name="email">
<button type="submit">Submit</button>
</form>
<form>
→ Creates a form.<input>
→ Accepts user input.<label>
→ Labels input fields.<button>
→ Submits the form.This section introduces CSS, its syntax, and how to style web pages.
CSS (**Cascading Style Sheets**) is used to **style** and **design** web pages. It controls the **colors, fonts, layouts, and animations** of a website.
There are **three** ways to apply CSS to an HTML document:
Method | Description | Example |
---|---|---|
Inline CSS | Styles applied directly inside an HTML tag | <p style="color: red;">Text</p> |
Internal CSS | Styles written inside the <style> tag in the
<head> |
<style> p { color: blue; } </style> |
External CSS | Styles written in a separate .css file |
<link rel="stylesheet" href="style.css"> |
CSS syntax consists of a **selector**, **property**, and **value**:
selector {
property: value;
}
p {
color: blue;
font-size: 18px;
}
p
→ **Selector** (which element to style)color
→ **Property** (what to change)blue
→ **Value** (new setting)All HTML elements are **boxes**. The **box model** consists of:
+----------------------+ | Margin (Outside) | +----------------------+ | Border (Outline) | +----------------------+ | Padding (Spacing) | +----------------------+ | Content (Text) | +----------------------+
p {
width: 300px;
padding: 10px;
border: 2px solid black;
margin: 20px;
}
width: 300px;
→ Sets content widthpadding: 10px;
→ Space inside the borderborder: 2px solid black;
→ Creates a black outlinemargin: 20px;
→ Space outside the borderCSS **selectors** target specific HTML elements.
Selector | Description | Example |
---|---|---|
Element Selector | Targets all elements of a type | p { color: blue; } |
Class Selector (.) | Targets elements with a class | .title { color: red; } |
ID Selector (#) | Targets an element with an ID | #header { font-size: 24px; } |
Group Selector (A, B) | Styles multiple elements | h1, h2 { text-align: center; } |
h1 {
color: red;
}
.title {
font-size: 20px;
font-weight: bold;
}
#main-header {
text-align: center;
}
CSS supports **different ways** to define colors:
Method | Example |
---|---|
Color Names | color: red; |
HEX Codes | color: #ff5733; |
RGB Values | color: rgb(255, 87, 51); |
h1 {
color: #ff5733;
background-color: black;
}
CSS controls **font size, weight, style, and spacing**.
p {
font-size: 18px;
font-weight: bold;
font-style: italic;
text-align: center;
text-decoration: underline;
}
CSS provides **layout techniques** to arrange elements.
.container {
display: flex;
justify-content: center;
align-items: center;
}
display: flex;
→ Enables **flexbox layout**justify-content: center;
→ Centers horizontallyalign-items: center;
→ Centers vertically
.container {
display: grid;
grid-template-columns: 1fr 1fr 1fr;
}
display: grid;
→ Enables **grid layout**grid-template-columns: 1fr 1fr 1fr;
→ Creates **three equal columns**
Websites should work on **all screen sizes** (mobile, tablet, desktop).
@media (max-width: 600px) {
body {
background-color: lightblue;
}
}
CSS can add simple animations to elements.
button {
background-color: blue;
transition: background-color 0.5s ease-in-out;
}
button:hover {
background-color: red;
}
transition: background-color 0.5s;
→ Changes color over **0.5 seconds**
when hovered.
@keyframes moveText {
from { transform: translateX(0px); }
to { transform: translateX(100px); }
}
h1 {
animation: moveText 2s infinite alternate;
}
Here’s an example of combining HTML and CSS:
index.html
)
<!DOCTYPE html>
<html lang="en">
<head>
<meta charset="UTF-8">
<meta name="viewport" content="width=device-width, initial-scale=1.0">
<title>Styled Web Page</title>
<link rel="stylesheet" href="style.css">
</head>
<body>
<h1 class="title">Welcome to My Website</h1>
<p>This is a styled paragraph.</p>
<button>Click Me</button>
</body>
</html>
style.css
)
body {
background-color: #f4f4f4;
font-family: Arial, sans-serif;
}
.title {
color: #ff5733;
text-align: center;
}
button {
background-color: blue;
color: white;
padding: 10px 20px;
border: none;
cursor: pointer;
}
button:hover {
background-color: red;
}
<div>
on the page.JavaScript (JS) is a programming language that makes web pages interactive. It allows you to create dynamic content, handle user interactions, and modify web page elements.
JavaScript is used for:
<button onclick="alert('Hello, JavaScript!')">Click Me</button>
💡 Explanation: Clicking the button displays an alert.
You can add JavaScript to your pages using three main methods:
Method | How It Works | Example |
---|---|---|
Inline JS | Directly inside an HTML tag | <button onclick="alert('Hello!')">Click</button>
|
Internal JS | Inside <script> in the HTML file |
<script> alert('Hello'); </script> |
External JS | In a separate .js file, linked to HTML |
<script src="script.js"></script> |
index.html
)
<!DOCTYPE html>
<html lang="en">
<head>
<meta charset="UTF-8">
<meta name="viewport" content="width=device-width, initial-scale=1.0">
<title>JavaScript Example</title>
<script src="script.js"></script>
</head>
<body>
<button id="myButton">Click Me</button>
</body>
</html>
script.js
)
document.getElementById("myButton").addEventListener("click", function() {
alert("You clicked the button!");
});
Variables store data in JavaScript. There are three ways to declare variables:
Keyword | Use Case |
---|---|
var |
Old method (not recommended) |
let |
Preferred for variables that change |
const |
Preferred for fixed values |
let name = "Alice"; // Can be changed
const age = 25; // Cannot be changed
console.log(name); // Output: Alice
console.log(age); // Output: 25
JavaScript has different types of data:
Type | Example |
---|---|
String (Text) | "Hello, World!" |
Number | 42 |
Boolean | true / false |
Array (List) | ["Apple", "Banana", "Cherry"] |
Object (Data Structure) | { name: "Alice", age: 25 } |
let greeting = "Hello"; // String
let number = 10; // Number
let isStudent = true; // Boolean
let fruits = ["Apple", "Banana", "Cherry"]; // Array
let person = { name: "Alice", age: 25 }; // Object
console.log(person.name); // Output: Alice
Operators perform actions on variables and values.
Operator | Description | Example |
---|---|---|
+ |
Addition | 10 + 5 → 15 |
- |
Subtraction | 10 - 5 → 5 |
* |
Multiplication | 10 * 5 → 50 |
/ |
Division | 10 / 5 → 2 |
% |
Modulus (Remainder) | 10 % 3 → 1 |
let x = 10;
let y = 5;
console.log(x + y); // Output: 15
console.log(x - y); // Output: 5
console.log(x * y); // Output: 50
console.log(x / y); // Output: 2
console.log(x % y); // Output: 0
if
, else
, switch
)
JavaScript conditionals allow you to make decisions in your code.
if-else
let age = 18;
if (age >= 18) {
console.log("You are an adult.");
} else {
console.log("You are a minor.");
}
switch
let day = "Monday";
switch (day) {
case "Monday":
console.log("Start of the week!");
break;
case "Friday":
console.log("Weekend is near!");
break;
default:
console.log("It's just another day.");
}
for
, while
)Loops repeat actions multiple times.
for
Loop
for (let i = 1; i <= 5; i++) {
console.log("Number: " + i);
}
while
Loop
let count = 3;
while (count > 0) {
console.log("Countdown: " + count);
count--;
}
Functions group reusable code.
function greet(name) {
console.log("Hello, " + name + "!");
}
greet("Alice"); // Output: Hello, Alice!
function add(a, b) {
return a + b;
}
console.log(add(3, 5)); // Output: 8
JavaScript can respond to user actions.
<button id="myBtn">Click Me</button>
<script>
document.getElementById("myBtn").addEventListener("click", function() {
alert("Button Clicked!");
});
</script>
Now that we know the basics of JavaScript, let’s explore advanced concepts like Scope, the DOM, and Event Handling to make our web pages more dynamic.
Scope determines where a variable can be accessed in your code.
Scope Type | Description |
---|---|
Global Scope | Variables declared outside a function can be used anywhere. |
Local Scope | Variables declared inside a function can only be used within that function. |
let globalVar = "I'm global!"; // Global variable
function myFunction() {
let localVar = "I'm local!"; // Local variable
console.log(globalVar); // ✅ Accessible
console.log(localVar); // ✅ Accessible
}
myFunction();
console.log(globalVar); // ✅ Accessible
console.log(localVar); // ❌ ERROR! localVar is not defined outside the function.
🔹 Explanation:
globalVar
can be used anywhere in the code.localVar
is only accessible inside
myFunction()
.The DOM (Document Object Model) allows JavaScript to interact with HTML elements.
Method | Description |
---|---|
getElementById("id") |
Selects an element by ID |
getElementsByClassName("class") |
Selects elements by class name |
getElementsByTagName("tag") |
Selects elements by tag name |
querySelector("selector") |
Selects the first matching element |
querySelectorAll("selector") |
Selects all matching elements |
<p id="myText">Original Text</p>
<button onclick="changeText()">Change Text</button>
<script>
function changeText() {
document.getElementById("myText").textContent = "Text Updated!";
}
</script>
🔹 Explanation: Clicking the button updates the paragraph text.
innerHTML
& textContent
)
document.getElementById("demo").innerHTML = "New Content!";
document.getElementById("demo").textContent = "New Text!";
document.getElementById("demo").style.color = "blue";
document.getElementById("demo").style.fontSize = "20px";
document.getElementById("box").classList.add("highlight");
document.getElementById("box").classList.remove("highlight");
Events allow JavaScript to respond to user actions like clicks, key presses, or form submissions.
Event | Description |
---|---|
click |
When a user clicks on an element |
mouseover |
When a user hovers over an element |
keydown |
When a user presses a key |
submit |
When a form is submitted |
<button id="btn">Click Me</button>
<script>
document.getElementById("btn").addEventListener("click", function() {
alert("Button Clicked!");
});
</script>
JavaScript can validate form inputs before submission.
<form onsubmit="return validateForm()">
<input type="text" id="name" placeholder="Enter your name">
<button type="submit">Submit</button>
</form>
<script>
function validateForm() {
let name = document.getElementById("name").value;
if (name === "") {
alert("Name field cannot be empty!");
return false;
}
return true;
}
</script>
🔹 Explanation:
setTimeout
& setInterval
)setTimeout
)
setTimeout(function() {
alert("This message appears after 3 seconds!");
}, 3000);
setInterval
)
setInterval(function() {
console.log("This runs every 2 seconds!");
}, 2000);
🔹 Explanation:
setTimeout()
runs once after a delay.setInterval()
runs repeatedly every X milliseconds.
Event listeners allow elements to respond dynamically to user actions.
<button id="changeColor">Change Background</button>
<script>
document.getElementById("changeColor").addEventListener("click", function() {
document.body.style.backgroundColor = "lightblue";
});
</script>
🔹 Explanation: Clicking the button changes the background color.
Local Storage allows web apps to store data in the browser.
localStorage.setItem("username", "Alice");
let user = localStorage.getItem("username");
console.log(user); // Output: Alice
localStorage.removeItem("username");
The Fetch API allows JavaScript to communicate with APIs.
fetch("https://jsonplaceholder.typicode.com/posts/1")
.then(response => response.json())
.then(data => console.log(data));
🔹 Explanation:
setInterval()
to update the current
time
on a webpage every second.https://jsonplaceholder.typicode.com/posts
and
display the first post on the page.
🎉 Great Job! You now understand JavaScript Advanced Concepts, including Scope, DOM Manipulation, Event Handling, Local Storage, and API Fetching.
Next, we’ll explore Back-End Development, where we’ll learn about servers, databases, and APIs.
Would you like to proceed with Back-End Development? 🚀
Back-end development focuses on the server-side of web applications. It handles data processing, databases, and user authentication, ensuring websites function properly.
Back-end development is responsible for:
🔹 Example: When you log into a website, the back-end checks your username & password and retrieves your profile data from a database.
Web applications use a client-server architecture:
Component | Description | Example |
---|---|---|
Client | The browser (front-end) | HTML, CSS, JavaScript |
Server | The backend that processes data | Node.js, Python, PHP |
Database | Stores information | MySQL, MongoDB |
🔹 How it Works:
Back-end development uses different programming languages to process requests.
Language | Used For | Example |
---|---|---|
Node.js | JavaScript for backend | Real-time apps, APIs |
Python | Easy-to-use backend | AI, Data Science |
PHP | Common for web apps | WordPress, Facebook |
🔹 Example: A Simple Server in Node.js
const http = require('http');
const server = http.createServer((req, res) => {
res.writeHead(200, { "Content-Type": "text/plain" });
res.end("Hello from the backend!");
});
server.listen(3000, () => {
console.log("Server is running on port 3000");
});
A database stores and manages website data (e.g., user accounts, products, messages).
Database Type | Description | Example |
---|---|---|
SQL (Relational) | Uses tables with rows & columns | MySQL, PostgreSQL |
NoSQL (Non-Relational) | Stores flexible data (JSON, key-value) | MongoDB, Firebase |
Feature | SQL (MySQL, PostgreSQL) | NoSQL (MongoDB, Firebase) |
---|---|---|
Data Structure | Tables (Rows & Columns) | Documents (JSON) |
Best For | Structured Data (Banking, CRM) | Unstructured Data (Chat Apps, IoT) |
APIs allow different systems to communicate.
🔹 Example:
When a weather app shows real-time temperature, it fetches data from a
Weather API.
Type | Example |
---|---|
REST API | GET /users |
GraphQL API | Custom data fetching |
const express = require('express');
const app = express();
app.get('/api/message', (req, res) => {
res.json({ message: "Hello from the API!" });
});
app.listen(3000, () => console.log("Server running on port 3000"));
Websites need authentication for secure access.
🔹 Example: Password Hashing (Node.js + bcrypt)
const bcrypt = require('bcrypt');
const password = "mypassword";
bcrypt.hash(password, 10, (err, hash) => {
console.log("Hashed Password:", hash);
});
The front-end uses JavaScript (Fetch API, Axios) to send requests to the back-end.
fetch("https://jsonplaceholder.typicode.com/posts")
.then(response => response.json())
.then(data => console.log(data));
CRUD stands for:
🔹 Example: Creating a New User (MongoDB + Node.js)
const mongoose = require('mongoose');
mongoose.connect("mongodb://localhost:27017/mydb", { useNewUrlParser: true });
const UserSchema = new mongoose.Schema({ name: String, email: String });
const User = mongoose.model("User", UserSchema);
const newUser = new User({ name: "Alice", email: "alice@example.com" });
newUser.save().then(() => console.log("User Saved!"));
Once a website is complete, it needs to be hosted online.
Platform | Used For |
---|---|
Heroku | Deploying Node.js apps |
Vercel | Hosting front-end + APIs |
Firebase | Hosting + Authentication |
🔹 Example: Deploying a Node.js API on Vercel
npm install -g vercel
vercel
"Hello, world!"
.🎉 Great Job! You now understand Back-End Development, including servers, databases, authentication, and APIs.
Next, we’ll explore JavaScript Asynchronous Programming, where we’ll learn about Promises, Callbacks, and Fetch API.
Would you like to proceed with Asynchronous JavaScript? 🚀
Asynchronous programming allows JavaScript to perform multiple tasks at the same time without waiting for one task to finish before starting another. This is important for handling API requests, user interactions, and database operations efficiently.
JavaScript is single-threaded, meaning it can only execute one operation at a time. Asynchronous programming allows it to perform multiple operations concurrently without blocking execution.
🔹 Example of a Blocking (Synchronous) Operation:
console.log("Start");
alert("This blocks everything until you click OK!");
console.log("End");
💡 Problem: The script stops executing until the alert box is closed.
🔹 Example of an Asynchronous Operation:
console.log("Start");
setTimeout(() => console.log("This runs later"), 2000);
console.log("End");
💡 Solution: The setTimeout()
function
waits for 2 seconds but doesn’t stop the rest of the code from running.
A callback is a function that is passed as an argument to another function and is executed after the first function completes.
function fetchData(callback) {
setTimeout(() => {
console.log("Data fetched!");
callback();
}, 2000);
}
fetchData(() => console.log("Processing data..."));
🔹 Explanation:
fetchData()
simulates fetching data from a server."Data fetched!"
and then
executes the callback function.A Promise is a special object that represents a task that will either complete successfully or fail in the future.
Promise State | Description |
---|---|
Pending | The initial state (waiting) |
Fulfilled | The operation was successful |
Rejected | The operation failed |
let myPromise = new Promise((resolve, reject) => {
let success = true;
setTimeout(() => {
if (success) resolve("Operation successful!");
else reject("Operation failed!");
}, 3000);
});
myPromise
.then(result => console.log(result)) // Runs if resolved
.catch(error => console.log(error)); // Runs if rejected
🔹 Explanation:
.then()
handles success, .catch()
handles failure.The Fetch API allows JavaScript to retrieve data from external sources (like a database or an API).
fetch("https://jsonplaceholder.typicode.com/posts/1")
.then(response => response.json()) // Convert response to JSON
.then(data => console.log(data)) // Log the data
.catch(error => console.log("Error:", error));
🔹 Explanation:
fetch()
sends a request to the API..then()
processes the response and converts it into JSON..catch()
handles errors.The async/await syntax makes working with asynchronous code cleaner and easier to read.
async function getPost() {
try {
let response = await fetch("https://jsonplaceholder.typicode.com/posts/1");
let data = await response.json();
console.log(data);
} catch (error) {
console.log("Error:", error);
}
}
getPost();
🔹 Explanation:
await fetch()
waits for the API request to complete.await response.json()
converts the response to JSON.try-catch
handles errors.Promise.all()
Promise.all()
runs multiple asynchronous tasks
at the same time.
let api1 = fetch("https://jsonplaceholder.typicode.com/posts/1").then(res => res.json());
let api2 = fetch("https://jsonplaceholder.typicode.com/users/1").then(res => res.json());
Promise.all([api1, api2])
.then(results => console.log("Post:", results[0], "User:", results[1]))
.catch(error => console.log("Error:", error));
🔹 Explanation:
Promise.all()
waits for both requests to complete.
index.html
)
<!DOCTYPE html>
<html lang="en">
<head>
<meta charset="UTF-8">
<meta name="viewport" content="width=device-width, initial-scale=1.0">
<title>Fetch API Example</title>
</head>
<body>
<h1>User Information</h1>
<button onclick="fetchUser()">Get User</button>
<p id="userData"></p>
<script src="script.js"></script>
</body>
</html>
script.js
)
async function fetchUser() {
try {
let response = await fetch("https://jsonplaceholder.typicode.com/users/1");
let user = await response.json();
document.getElementById("userData").textContent = `Name: ${user.name}, Email: ${user.email}`;
} catch (error) {
console.log("Error fetching user:", error);
}
}
🔹 Explanation:
<p id="userData">
.
❌ Not Handling Errors in Fetch API
fetch("wrong-url")
.then(response => response.json()) // Will fail
.then(data => console.log(data))
.catch(error => console.log("Error occurred!", error)); // ✅ Catch errors
❌ Forgetting await
in Async/Await
// Incorrect
async function getData() {
let response = fetch("https://jsonplaceholder.typicode.com/posts/1"); // ❌ Missing await
let data = response.json();
console.log(data);
}
✅ Fix: Add await
async function getData() {
let response = await fetch("https://jsonplaceholder.typicode.com/posts/1");
let data = await response.json();
console.log(data);
}
https://jsonplaceholder.typicode.com/users/1
and logs their
name & email.
"Hello, World!"
.Promise.all()
to fetch
two API endpoints at the same time.
https://official-joke-api.appspot.com/random_joke
and displays it.
Now that we've covered HTML, CSS, JavaScript, APIs, and Databases, it's time to build a real-world web project that integrates everything we've learned.
A Task Manager App allows users to:
📁 Create a folder called TaskManager
📁 Inside, create the following files:
TaskManager/
│── index.html (HTML structure)
│── style.css (CSS for styling)
│── script.js (JavaScript logic)
index.html
)Create the basic structure for the Task Manager UI.
<!DOCTYPE html>
<html lang="en">
<head>
<meta charset="UTF-8">
<meta name="viewport" content="width=device-width, initial-scale=1.0">
<title>Task Manager</title>
<link rel="stylesheet" href="style.css">
</head>
<body>
<h1>Task Manager</h1>
<div class="container">
<input type="text" id="taskInput" placeholder="Enter a task...">
<button onclick="addTask()">Add Task</button>
</div>
<ul id="taskList"></ul>
<h3>Motivational Quote:</h3>
<p id="quote">Loading...</p>
<script src="script.js"></script>
</body>
</html>
style.css
)Make the task manager look clean and modern.
body {
font-family: Arial, sans-serif;
text-align: center;
background-color: #f4f4f4;
}
.container {
margin: 20px auto;
}
input {
padding: 10px;
width: 60%;
border: 1px solid #ddd;
}
button {
padding: 10px;
background-color: blue;
color: white;
border: none;
cursor: pointer;
}
ul {
list-style: none;
padding: 0;
}
li {
background-color: white;
padding: 10px;
margin: 5px auto;
width: 60%;
display: flex;
justify-content: space-between;
border-radius: 5px;
}
.completed {
text-decoration: line-through;
color: gray;
}
script.js
)
function addTask() {
let taskInput = document.getElementById("taskInput");
let taskText = taskInput.value.trim();
if (taskText === "") return alert("Task cannot be empty!");
let taskList = document.getElementById("taskList");
let li = document.createElement("li");
li.innerHTML = `
${taskText}
<button onclick="completeTask(this)">✔</button>
<button onclick="deleteTask(this)">❌</button>
`;
taskList.appendChild(li);
saveTasks();
taskInput.value = "";
}
🔹 Explanation:
saveTasks()
to store tasks.
function completeTask(button) {
let li = button.parentElement;
li.classList.toggle("completed");
saveTasks();
}
🔹 Explanation: Toggles completed task styling when clicking ✔.
function deleteTask(button) {
let li = button.parentElement;
li.remove();
saveTasks();
}
🔹 Explanation: Removes a task when clicking ❌.
function saveTasks() {
let tasks = [];
document.querySelectorAll("#taskList li").forEach(li => {
tasks.push({ text: li.textContent, completed: li.classList.contains("completed") });
});
localStorage.setItem("tasks", JSON.stringify(tasks));
}
function loadTasks() {
let savedTasks = JSON.parse(localStorage.getItem("tasks")) || [];
let taskList = document.getElementById("taskList");
savedTasks.forEach(task => {
let li = document.createElement("li");
li.innerHTML = `
${task.text}
<button onclick="completeTask(this)">✔</button>
<button onclick="deleteTask(this)">❌</button>
`;
if (task.completed) li.classList.add("completed");
taskList.appendChild(li);
});
}
window.onload = loadTasks;
🔹 Explanation:
saveTasks()
: Stores tasks in Local Storage.loadTasks()
: Loads saved tasks when the page
refreshes.
async function fetchQuote() {
try {
let response = await fetch("https://api.quotable.io/random");
let data = await response.json();
document.getElementById("quote").textContent = `"${data.content}" - ${data.author}`;
} catch (error) {
document.getElementById("quote").textContent = "Failed to load quote.";
}
}
fetchQuote();
🔹 Explanation:
https://api.quotable.io/random
.<p id="quote">
.index.html
in a browser.
TaskManager/
│── index.html (HTML structure)
│── style.css (CSS for styling)
│── script.js (JavaScript logic)
🔗 Full Code Repository
- HTML + CSS + JavaScript
- Uses Local Storage for saving tasks.
- Fetches Motivational Quotes via API.
Now that we've built the Task Manager App, the next step is to deploy it online so that anyone can access it from a browser.
Platform | Best For | Supports Backend? | Free Plan? |
---|---|---|---|
GitHub Pages | Static websites (HTML, CSS, JS) | ❌ No | ✅ Yes |
Netlify | Front-end & API hosting | ⚠️ Limited | ✅ Yes |
Vercel | Full-stack projects (Next.js, APIs) | ✅ Yes | ✅ Yes |
💡 Recommendation:
TaskManagerApp
.
git init
git add .
git commit -m "Initial commit"
git branch -M main
git remote add origin https://github.com/YOUR_USERNAME/TaskManagerApp.git
git push -u origin main
🔹 Explanation:
Initializes Git, adds files, commits changes, and pushes them to GitHub.
https://YOUR_USERNAME.github.io/TaskManagerApp
🎉 Done! Your project is now live!
Netlify is easier than GitHub Pages and allows hosting projects with backend APIs.
Follow the GitHub steps above to push your project.
TaskManagerApp
repository.🎉 Your site is now live on Netlify!
mytasks.com
).Vercel supports front-end & back-end hosting, making it ideal for full-stack apps.
Follow the GitHub setup steps above.
🎉 Your full-stack app is now live on Vercel!
Every time you make updates:
git add .
git commit -m "Updated feature"
git push origin main
🚀 GitHub, Netlify, or Vercel will automatically update your site!
Issue | Solution |
---|---|
Website not showing? | Wait a few minutes & refresh |
CSS/JS not loading? | Clear cache (Ctrl + Shift + R ) |
Custom domain not working? | Check DNS settings |